Check how to set a lan between two or more computers, full tricks to lan set up information, Configuration the LAN was not so much easy before that so keep continue reading to set a lan
SETTING UP YOUR OWN LAN
This chapter shows how to set up a local network in your home or office (if you already have a functioning network, feel free to skip to the next chapter). In the next few pages, we’ll take a look at:
· The basics of network hardware
· Basic hardware requirements for your local network
· Installing the hardware and setting up a local peer-to-peer network
· Inspecting and changing network settings
A. NETWORK HARDWARE BASICS
Cables. We recommend Category 5 cables for new users. Officially called Ethernet 10/100BaseT,
they’re the most common type of network cable and provide a good upgrade path should you need it. Cat 5 allows either 10- or 100-megabyte communication. These terms have simple meanings, so don’t let them put you off:
· The “10” or “100” in 10/100BaseT refers to network connection speed—i.e., 10 Megabits or 100 Megabits per second. Most networks actually top out at less, though most users would never know.
· The “T” in BaseT refers to the wire type, twisted-pair, which consists of pairs of thin wires twisted around each other. It also refers to the connector, commonly called an RJ-45, which resembles a bigger and wider telephone connector.
· “Base” means that the cable is used for baseband (i.e., simple, single frequency) rather than broadband (multiplex or analog) networks. Cables can be purchased in different lengths and often different colors. They come with a male RJ-45 plug at each end. Cards and hubs have female RJ-45 jacks. Network Cards. A wide variety of network cards—officially called Network Interface Cards and nicknamed NICs—is available. Most do at least an adequate job. If you’re a novice networker, the primary things to look for are:
· Connection Jack. Be sure the NIC’s jack matches the type of cable you’re using. If you’re using 10BaseT cable, for instance, the NIC you buy should have an RJ-45 compatible connector.
· Plug and Play compatibility. This feature allows Windows 95/98 to automatically configure the card, saving you a lot of time in the process.
· Interrupt Addresses. Interrupts on any machine are at a premium, so you’ll want to determine
which ones the NIC has available. Generally, the more you pay, the more latitude you’ll have. ISA-bus cards are usually fast enough for a 10BaseT network; if you’re running 100BaseT you’ll
probably want to go with PCI-bus card for speed. If you’ve only got one interrupt left and must add two cards, use two PCI-bus network cards; part of the PCI spec is that cards can share Interrupts.
Hubs.
Ethernet is a standardized way of connecting computers together to create a network. A hub is an ethernet device used in conjunction with 10BaseT and 100BaseT cables. The cables run from the network’s computers to ports on the hub. Using a hub makes it easier to move or add computers, find and fix cable problems, and remove computers temporarily from the network (if they need to be upgraded, for instance). Hubs are available in most computer stores. It’s probably a good idea to buy one with more ports than you need, just in case your network expands. Look for:
· A connection jack compatible with your cabling.
· A cascading jack which allows you to add an additional hub later, if necessary, without replacing
the entire unit.
· Lights on the front. These can be useful when you’re trying to diagnose network connection problems.
B. HARDWARE FOR YOUR SPECIFIC LAN REQUIREMENTS
The kind of hardware you use depends on the kind of access and/or modem you’re using. If you’re using dial-up access you’ll need:
· One network card for each computer.
· One hub.
· A cable for each connection to the hub.
If you’re using cable modem, DSL modem or direct access you’ll need:
· One network card for each computer.
· One additional network card to connect to the modem (your WinProxy machine receives two cards, one for the modem and one for the local network).
· One hub.
· A cable for each hub connection.
· An additional cable for the connection from the computer to the modem. If the modem is the type that connects directly to the hub, make this last cable a cross-over cable instead and you’ll still be able to connect directly to the network card as shown. Before you rush out and buy a ransom’s worth of network hardware, however, take a few moments to draw a topography—a diagram which shows the relation between the network’s various components. Doing so lessens the chance that you’ll buy unnecessary cables or forget to buy a hub. Let’s look at a very simple topography. Assuming that you already have Internet access through an ISP, you’re probably connected to the Internet in this manner:
Now let’s look at the topography for a simple LAN. The network shown here—the number of client machines can be far greater, of course—is the standard configuration for most setups, including dialup access and cable-modem access:
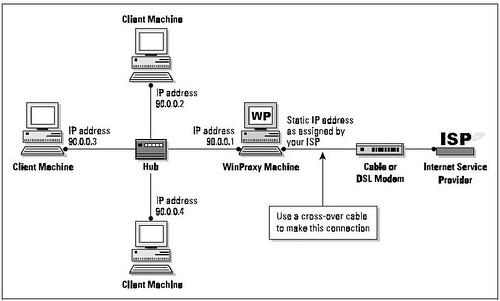
As you can see, only one computer—the WinProxy computer—has a modem. The other computers are connected to each other and to the WinProxy computer by a device called a hub (more on this later). The computer using the modem and receiving the WinProxy installation must be a Windows95/98 or Windows NT machine. Other computers on the local network can be any kind—including Macs, Unix boxes, and WfWG3.11—as long as they’re capable of “speaking” TCP/IP. Once you’ve drawn your network topography, including all components, make a list of everything you need.
| Notes 1. Many cable modem providers insist on installing the cable modem card themselves, and may insist upon using their own card. Before purchasing your own cables and cards, check to see what the provider’s policy is. 2. If you have only two computers, it’s possible to save the expense of a hub by connecting them back-to-back. To do so, run a cross-over cable directly from one network card to the network card on the other machine. IP addressing will still be done as described here |
|---|
C. HARDWARE INSTALLATION/SETTING UP THE PEER-TOPEER
NETWORK
The best way to install an NIC is to simply follow the manufacturer’s directions. Win95/98 usually finds a new card when it starts up and then configures it for you. If it doesn’t, consult the directions that came with the card. Run a cable between each card and the hub (except for the external network card if you have a cable modem setup). Although you can probably get away with plugging/unplugging a cable from a card while the computer is running, it’s safer to do it when the computer is turned off. You can usually plug or unplug from the hub at any time.
You’ll need at least one protocol assigned to each card once it’s installed. Choose NetBEUI (NetBios Extended User Interface) at a minimum; you can have others as well. There isn’t any problem with having multiple protocols on your local network. You’ll need the TCP/IP protocol later in order to run WinProxy, but it’s not needed now when setting up a basic peer-to-peer network. Set up your basic network first, get it working, and we’ll add TCP/IP later on. During the card setup, you’ll be prompted for certain settings. If not already installed, be sure to add for each machine:
· Client for Microsoft Networks
· File and Printer Sharing
You can make changes to your settings at any time in the future. You must reboot the computer
for the changes to take effect.
D. INSPECTING AND CHANGING NETWORK SETTINGS
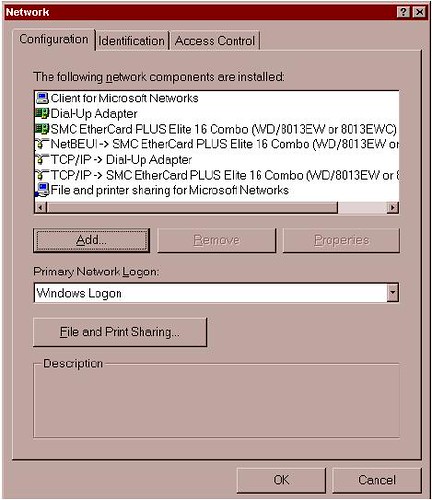
At this point, let’s double-check the computer network setup at Control Panel/Networks. In the window under the Configuration Tab, you’ll see a list of adapters and protocols. A typical setup is represented by a couple of small computer-shaped icons, one captioned Client for Microsoft Networks, and the other File and Printer Sharing. You’ll also see small green icons, similar in shape to a network card—one for each network card, and one for the Dial-Up Adapter (the Dial-Up Adapter counts as a network connection, with its own set of addresses and protocols). Finally, you’ll see a series of wire-and-node icons, each listing a different protocol-and-adapter combination, written in a form something like NetBEUI Æ NE2000 Compatible Card.
If you haven’t already added Client for Microsoft Networks, do so now:
· Highlight an adapter.
· Click through the path Add/Client/Microsoft/Client for Microsoft Networks.
To add a protocol capability to a network card:
· Highlight the network card.
· Click through the path Add/Protocol/Microsoft/Your Protocol. Click on the Identification Tab, where you’ll see three entry boxes titled:
Computer name: A name assigned by you to a computer (each computer on the network should have a unique name). Avoid punctuation marks. These names are frequently used in network configurations, and you’ll save confusion later by assigning distinctive names now. Old486 is a good name if you only have one 486 computer, but if you have several, assign them names like PapaBear, MamaBear, etc. NetBEUI uses this name to find things so it can perform its networking magic. You’ll sometimes see this computer name referred to as “the NetBios name.”
Workgroup Name: A group name you can assign to all the computers on your network (or you can use the default).
Computer Description: A caption that gives users on your local network information about an individual computer. An example: Maria’s Computer
| Security Alert The designated protocol will usually be assigned exactly as you’ve requested. (In Windows 95 and 98, however, Microsoft assigns the NetBEUI protocol to all network adapters when you assign it to any single network adapter). If you don’t want that protocol in the other locations, highlight each one you don’t want and click Remove. |
|---|
A Final Word on Your LAN
Congratulations! You now possess a working local network. You can see the other computers, move files between them, and print documents. To prepare for WinProxy and the Internet, you’ll need to add the TCP/IP protocol to each of the computers on your local network. You’ll learn how to do so in the next chapter. Once that’s done, it’s on to WinProxy!
ADDING TCP/IP TO YOUR NETWORK
TCP/IP Overview
The easiest way to install and configure WinProxy is to first add TCP/IP—the language spoken by WinProxy and the Internet—to your local network. This chapter covers the following topics:
1. Protocols and Addressing
2. Double-Checking Your Installed Network
3. Installing TCP protocol on your computers
4. Assigning IP addresses
5. Testing TCP/IP connectivity
A. FIRST THINGS FIRST: PROTOCOLS AND ADDRESSING Protocols. In networking terms the word “protocol” refers to the accepted standards or rules for the way data is transferred between computers and over the Internet. When everybody uses the same rules, it all works. There are many protocols in use. The three commonly used by local networks are NetBEUI, IPX/SPX, and TCP/IP.
NetBEUI is an acronym which stands for NetBios Extended User Interface. NetBEUI is a networking standard well suited for small networks and is easy to set up. It is also non-routable; since it uses computer names to find its way around, it can’t find distant computers.
IPX/SPX is Novell network’s version of IP addressing, used on Novell NetWare networks for both small and large systems. It works on Novell networks, but not between different types of networks (as TCP/IP will). TCP/IP, the language of the Internet, can be used on any size network. Data is sent over the network in chunks called packets. TCP (Transmission Control Protocol) is the protocol for packets of data sent over the wires. IP (Internet Protocol) is the addressing method used to get these packets to and from the right place. It is a routable protocol, designed to find distant computers. Some carefully-defined address groups are designated as intentionally non-routable; we’ll be using one of these to set up TCP/IP on your local network in the next chapter.
Network Addresses. These addresses may be assigned manually by the user, or automatically by another computer. They’re called static (i.e., fixed) assignments when assigned by the user, because they stay the same over time. When assigned automatically by computer, they’re known as dynamic (i.e., changing) assignments. If you connect via a dial-up connection, you’ll probably have a dynamic IP assignment to your Dial-Up Adapter. Your ISP assigns a different IP address to your Dial-Up Adapter each time you connect. If connecting with a cable modem, you’ll most likely have to make a static IP assignment for your Internet connection. Once this assignment is made, the IP address will not change. In addition, you’ll also have the choice of static or dynamic addresses on most of your networked computers. You can either set static IP addressing information yourself or have WinProxy make dynamic IP assignments for you. Addresses are not assigned to the computer itself, though people often speak that way as a convenient shorthand. The addresses are actually assigned to each network connection. The computer on which WinProxy will be installed, for instance, will have two network connections: an internal connection to the rest of your computers, and an external connection to your Internet Service Provider, or ISP.
In “Internet speak,” any machine with a network address is called a Host. For most simple TCP/IP systems, each host is a computer, and each computer is a host. The IP address is a 32-bit address, subdivided into four fields. Although it’s a binary number, it’s usually written in decimal form—222.5.83.47, for example. Each field can have a value from 0 through 255. However, since the end values are used for special purposes, the actual range available is from 1 to 254. What this boils down to for you, the user, is this: when entering an IP address, use only numbers between 1 and 254 in that last field.
Associated with the IP address is the subnet mask. This mask tells the computer which part of the address is unique to that machine, and which part is the general network address. Subnet masks allow you to accomplish many esoteric addressing capabilities; however, for most simple networks the subnet mask of 255.255.255.0 is the best and easiest choice. When you use this mask, the numbers in the final field of the IP address are unique to each computer, and the preceding three fields define the network address. To learn more about the intricacies of subnet masks. Some specific IP address ranges are reserved for special uses. We’ll discuss these later when setting up IP addressing on your local network. Network addresses reserved for testing or for local networks are 10.x.x.x, 90.x.x.x, 172.16-31.x.x and 192.168.x.x. These addresses all share a crucial distinction: routing computers on the Internet will not route these numbers. Since they are perfectly good numbers on a local network, but cannot be routed across the Internet, using them adds security to your local network.
Parts of a TCP packet are fields that specify the source and destination ports. These are 16-bit fields, and can thus specify more than 65 thousand ports. You’ll see many references to ports when interfacing your local net to the Internet. Ports 1 through 1024 are set aside for specific uses. Each Internet protocol has a standard port assigned to its use (e.g., Port 25 to send mail, Port 119 for news groups). In many cases, things can be easier to follow if you consider a port designation to be part of the address; some software even allows you to specify an IP address and port combination in the same statement.
B. DOUBLE-CHECKING YOUR INSTALLED NETWORK
Before going further, let’s double-check to be sure you have a basic network installed. At this point, your network should look like this:
· Your computers are connected via a working Ethernet network.
· One of the computers has an Internet connection, and is using Windows 95/98 or NT. That computer gets the WinProxy installation and will be known as the WinProxy computer.
· You already have some network protocols installed, including NetBEUI, and your computers already have NetBios names. The NetBios name of each computer can be found at Control Panel/Network/Identification/Computer Name. If your network doesn’t match these specifications, please bring it into line, using Chapter 3 to guide you, before attempting to install TCP Protocol and WinProxy. On the other hand, if you do have a basic network, read on!
C. INSTALLING TCP/IP PROTOCOL ON YOUR COMPUTERS
All communication between the client applications and WinProxy, and between WinProxy and the Internet, use TCP/IP protocols. Thus, the first thing you must do is add the TCP protocol and IP addresses to the network’s computers. As you proceed, pay attention to the dictates of the following three connection types:
1. The external WinProxy connection to the Internet. The type of IP address used—dynamic (commonly used for standard modems) or static (commonly used for cable modems)—is dictated by the ISP to which you connect and the type of service it provides.
2. The internal WinProxy connection. This connection must be a static IP assignment, and it must be assigned by you. Two reasons exist for a static assignment. First, some client applications must have a single, known address for the proxy server; second, the static assignment is used by WinProxy as a starting place for its DHCP assignments when providing tcp/ip assignments to your other computers.
3. The client computer network connections. These connections can be either dynamic or static. If they’re dynamic, WinProxy automatically makes all IP assignments and settings—the preferred method when using the WinProxy 3.0 Install Wizard. If they’re static, you must enter IP settings for each client computer. We recommend dynamic assignments for new users. Several protocols can co-exist on a local network, and you’ll usually need to have more than one. One protocol is sufficient on the connection to the Internet, and for security reasons you should have only TCP/IP. Let’s proceed. To install TCP.
1. On the machine receiving the WinProxy installation, click Control Panel/Network/Configuration. You’ll see a list of installed new components, and there should be listings for a Dial-Up adapter and a LAN adapter (exact wording varies). Look under LAN adapter to see if you have TCP installed—if it is, the listing will read something like TCP/IP ® LAN Adapter. Again, the exact wording varies.
2. If TCP/IP isn’t listed, click through this path: LAN Adapter/Add/Protocol/ Microsoft/TCPIP/
OK. That’s it! You’ll be prompted to restart, finishing the installation. Do so if you like, or you can wait until completing the next step before restarting.
3. Return to the initial screen. Look under Dial-Up Adapter to see if you have TCP/IP installed. If not, click through this path: DialUp Adapter/Add/ Protocol/Microsoft/TCP-IP/OK. When prompted to restart the computer, do so.
4. Add the TCP/IP protocol to each client machine (unless it’s already installed). The process is the same: in Control Panel/Networks look for a TCP/IP ® LAN Adapter line, adding the TCP/IP
protocol to the LAN adapter if it isn’t already installed.
| For Client Machines Only After completing Step 4, take a quick look at any dial-up adapters. If any are installed and have the TCP protocol assigned, look under Properties to ensure that the dial-up adapter does not have the option Assign a specific IP address selected. It should be set to Obtain an IP address automatically. This will save you trouble down the road. |
|---|
D. ASSIGNING IP ADDRESSES TO ALL NETWORK COMPUTERS
Each computer must be assigned a unique IP address. Strictly speaking, an IP address is assigned to each network connection, but it’s convenient to speak of a “machine address.” If you set your client computers to Obtain an IP address automatically (see the boxed note immediately above), WinProxy takes care of all of these settings for you. We recommend using the 90.0.0.x series of addresses on your local network. You’ll reap three major benefits by doing so:
· Your setup will match the numbers used for diagrams and instructions on the WinProxy website.
· You’ll find it much easier to follow explanations and trouble-shoot your network problems should the need arise.
· You’ll add to the security of your local computers by using this non-routing series on your local
network.
Now let’s proceed to assigning IP addresses.
1. First, let’s assign an IP address to the WinProxy machine. To do so, follow this path:
Control Panel/Network Configuration/TCP/IP/LANAdapter/Properties. Bring the IP Address Tab to the front. Click Specify an IP Address and enter an IP address and subnet mask. We recommend 90.0.0.1 and 255.255.255.0, as shown in the screen. You shouldn’t need to make any changes on other tabs for this basic installation.
2. Use the method shown above to install an IP address on each client machine. It’s easiest to use a sequential series such as 90.0.0.2, 90.0.0.3 and so on. Each computer gets a subnet mask of 255.255.255.0. Each IP address on your local network must be unique, and you can only vary the number in the final group—in other words, don’t change the 90.0.0 portion of the address.

3. If you’ll be using a dial-up connection to an Internet provider, the dial-up adapter does not get a specific IP assignment. Set it to Obtain an IP Address Automatically. The IP address for this connection will be dynamically assigned by the ISP each time you connect. These addresses come from a pool, and will probably (but not necessarily) be different each time you connect.
4. If, instead, you’ll be using a direct connection to your Internet provider (as many cable modems do), the network card connected to the modem should be assigned the IP address and subnet mask specified by your ISP for your individual Internet connection. Remember: you must have two network cards on this machine—one for the direct external connection to your provider and one for the internal connection to the rest of the computers on your local network.
The network card connecting to the rest of your local network retains the IP assignment it received in Step 1, above. At the conclusion of your installation, click through to WinProxy/Advanced Properties/General/ Multiple IP. While there, check to see that the IP number assigned to your Internet connection is defined as an external connection, and the IP number assigned to your local network is defined as an internal connection.
E. TESTING TCP/IP CONNECTIVITY
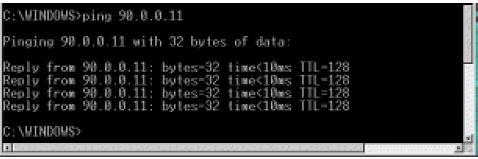
Now that you’ve added TCP/IP to all your computers, let’s run a test to determine if Network Neighborhood is up and running properly. If it is, you’ll know that the hub and cables are working correctly. We’ll use Ping for our test. It’s a simple tool included in Windows 95/98 and NT that allows easy checking of TCP/IP connectivity. First, open a DOS box (Start/Program/MS-DOS Prompt in Windows 95/98, and Start/Program/Command Prompt in Windows NT) and type the word ping. You’ll see a list of. commands and command syntax. If you’re on, say, client machine 90.0.0.2, you can check your connectivity to the WinProxy machine by typing in its IP address (90.0.0.1) after you type the word ping. If TCP/IP is properly set up on both machines you’ll get several lines that say Reply from 90.0.0.1…, as shown in the screen below. If you get no reply, something is wrong with the protocol installation of the IP address on one (or both) machines.
This series of three tests, run on each machine with a communications problem, will probably help isolate the problem:
1. Ping 127.0.0.1 to ensure that your tcp/ip software is working.
2. Ping yourself to ensure that the card is working.
3. Test to see that you can communicate with another machine.
· To run the first test (pinging the loopback address), type ping 127.0.0.1 at the DOS prompt. This verifies that the software TCP/IP stack on that machine is working and that the TCP protocol has been assigned (bound) to the card. The loopback address is specifically designated for such tests and doesn’t generate any actual network traffic. A failure at this point would implicate the software. If that’s the case, consider re-installing Winsock from your Windows CD-ROM, or download and install the latest Winsock from Microsoft.
· Now ping the IP address of the WinProxy computer, verifying that the card is working and IP addressing is correctly configured on that machine. If you discover a problem at this point, check to see that your network card is working properly. In Windows 95/98, go to Control Panel\System\Device Manager to see if there is a yellow exclamation point or question mark on your network card. If there is, click Drivers, and then choose View Resources to determine if Windows reports a conflict—e.g., an interrupt conflict. If so, you may be able to resolve the conflict by assigning an unused interrupt. If not, try reinstalling the card.
· Ping the IP address of another machine on your network. To work properly, the configuration must be correct on both machines. A problem at this stage usually indicates an IP addressing error. You’ve probably violated one of the basic IP rules, perhaps assigning the same number to two different machines, assigning a number outside the allowed range, or simply mis-typing an address. Check and double-check the assigned addresses. If you get a response such as request timed out, it means that ping did not reach (or return from) the other machine. Look for misconfigured IP addresses or unplugged hubs. If your response is something like destination unreachable, then ping didn’t know how to follow through on your request. You might get this response if, for example, you pinged an address with a different set of network fields. Look for misnamed nets or misconfigured subnet masks.
| USER’S CHECKPOINT: If everything works except the last test (pinging another computer) an old proxy installation may be interfering. Proxy software that requires installation of software components on client machines as well as on the proxy server can cause tcp/ip communication problems. This software must be removed from each machine for proper tcp/ip communication. |
|---|
If there seems to be a problem with a network card, go to Control Panel/ System/Device Manager/View Devices by Type. Look under Network Adapters. If you see a yellow exclamation point or question mark over the adapter, the system is having a problem with that adapter. Use the Win95/98 wizards to help track down problems. If you upgraded from Windows 95 to Windows 98, your network card drivers are probably out of date. Download new drivers made specifically for Windows 98 from the manufacturer’s web site.

1 responce(s):
It really new thing that I saw in ur website..It so good ...I loved ur blogs and wat information that u issued is really very usefull for us .. thanks ..
Home Network Setup
Post a Comment